spring ioc 容器的加载流程
1.目标:熟练使用spring,并分析其源码,了解其中的思想。这篇主要介绍spring ioc 容器的加载
2.前提条件:会使用debug
3.源码分析方法:Intellj idea debug 模式下源码追溯 通过ClassPathXmlApplicationContext 进行xml 件的读取,从每个堆栈中读取程序的运行信息
4.注意:由于Spring的类继承体系比较复杂,不能全部贴图,所以只将分析源码之后发现的最主要的类继承结构类图贴在下方。
5.关于Spring Ioc Demo:我们从demo入手一步步进行代码追溯。
Spring Ioc Demo
1.定义数据访问接口IUserDao.java
public interface IUserDao {
    public void InsertUser(String username,String password);
}
2.定义IUserDao.java实现类IUserDaoImpl.java
public class UserDaoImpl implements IUserDao {
    @Override
    public void InsertUser(String username, String password) {
        System.out.println("----UserDaoImpl --addUser----");
    }
}
3.定义业务逻辑接口UserService.java
public interface UserService {
    public void addUser(String username,String password);
}
4.定义UserService.java实现类UserServiceImpl.java
public class UserServiceImpl implements UserService {
    private     IUserDao  userDao;    //set方法
    public void  setUserDao(IUserDao  userDao) {
        this.userDao = userDao;
    }
    @Override
    public void addUser(String username,String password) {
        userDao.InsertUser(username,password);
    }
}
bean.xml配置文件
<beans xmlns="http://www.springframework.org/schema/beans"
       xmlns:xsi="http://www.w3.org/2001/XMLSchema-instance"
   xsi:schemaLocation="http://www.springframework.org/schema/beans
http://www.springframework.org/schema/beans/spring-beans-3.0.xsd         ">
 <!--id名字自己取,class表示他代表的类,如果在包里的话需要加上包名-->
 <bean id="userService"  class="UserServiceImpl" >
        <!--property代表是通过set方法注入,ref的值表示注入的内容-->
        <property  name="userDao"  ref="userDao"/>
 </bean>
  <bean id="userDao"  class="UserDaoImpl"/>
</beans>
ApplicationContext 继承结构
1.顶层接口:ApplicationContext
2.ClassPathXmlApplicationContext实现类继承AbstractXmlApplication 抽象类
3.AbstractXmlApplication 继承AbstractRefreshableConfigApplicationContext
4.AbstractRefreshableConfigApplicationContext抽象类继承AbstractRefreshableApplicationContext 5.AbstractRefreshableApplicationContext 继承 AbstractApplicationContext
6.AbstractApplicationContext 实现ConfigurableApplicationContext 接口
7.ConfigurableApplicationContext 接口继承 ApplicationContext接口 总体来说继承实现结构较深,内部使用了大量适配器模式。
以ClassPathXmlApplicationContext为例,继承类图如下图所示:

Spring Ioc容器加载过程源码详解
在开始之前,先介绍一个整体的概念。即spring ioc容器的加载,大体上经过以下几个过程: 资源文件定位、解析、注册、实例化
1.资源文件定位 其中资源文件定位,一般是在ApplicationContext的实现类里完成的,因为ApplicationContext接口继承ResourcePatternResolver 接口,ResourcePatternResolver接口继承ResourceLoader接口,ResourceLoader其中的getResource()方法,可以将外部的资源,读取为Resource类。
2.解析DefaultBeanDefinitionDocumentReader, 解析主要是在BeanDefinitionReader中完成的,最常用的实现类是XmlBeanDefinitionReader,其中的loadBeanDefinitions()方法,负责读取Resource,并完成后续的步骤。ApplicationContext完成资源文件定位之后,是将解析工作委托给XmlBeanDefinitionReader来完成的 解析这里涉及到很多步骤,最常见的情况,资源文件来自一个XML配置文件。首先是BeanDefinitionReader,将XML文件读取成w3c的Document文档。
DefaultBeanDefinitionDocumentReader对Document进行进一步解析。然后DefaultBeanDefinitionDocumentReader又委托给BeanDefinitionParserDelegate进行解析。如果是标准的xml namespace元素,会在Delegate内部完成解析,如果是非标准的xml namespace元素,则会委托合适的NamespaceHandler进行解析最终解析的结果都封装为BeanDefinitionHolder,至此解析就算完成。 后续会进行细致讲解。
3.注册 然后bean的注册是在BeanFactory里完成的,BeanFactory接口最常见的一个实现类是DefaultListableBeanFactory,它实现了BeanDefinitionRegistry接口,所以其中的registerBeanDefinition()方法,可以对BeanDefinition进行注册这里附带一提,最常见的XmlWebApplicationContext不是自己持有BeanDefinition的,它继承自AbstractRefreshableApplicationContext,其持有一个DefaultListableBeanFactory的字段,就是用它来保存BeanDefinition 所谓的注册,其实就是将BeanDefinition的name和实例,保存到一个Map中。
刚才说到,最常用的实现DefaultListableBeanFactory,其中的字段就是beanDefinitionMap,是一个ConcurrentHashMap。 代码如下:
DefaultListableBeanFactory继承实现关系
public class DefaultListableBeanFactory
extends
AbstractAutowireCapableBeanFactory
implements
ConfigurableListableBeanFactory,
BeanDefinitionRegistry,
Serializable {
     // DefaultListableBeanFactory的实例中最终保存了所有注册的bean    beanDefinitionMap
     /** Map of bean definition objects, keyed by bean name */
     private final Map<String, BeanDefinition> beanDefinitionMap
     = new ConcurrentHashMap<String, BeanDefinition>(64);
     //实现BeanDefinitionRegistry中定义的registerBeanDefinition()抽象方法
     public void registerBeanDefinition(String beanName, BeanDefinition    beanDefinition)      throws BeanDefinitionStoreException {
     }
BeanDefinitionRegistry接口
public interface BeanDefinitionRegistry extends AliasRegistry {
    //定义注册BeanDefinition实例的抽象方法
    void registerBeanDefinition(String beanName, BeanDefinition beanDefinition)         throws BeanDefinitionStoreException;
4.实例化
注册也完成之后,在BeanFactory的getBean()方法之中,会完成初始化,也就是依赖注入的过程 大体上的流程就是这样。
refresh()方法
1.目标: 这篇记录debug 追溯源码的过程,大概分三个篇幅,这是第一篇,现整体了解一下运行流程,定位资源加载,资源解析,bean 注册发生的位置。
2.记录结构: 1.调试栈截图 2.整体流程 3.bean.xml的处理
每段代码下面有相应的讲解
调试栈截图
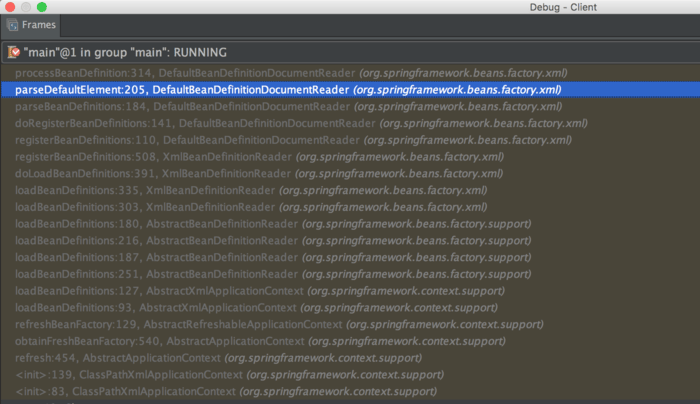
每个栈帧中方法的行号都有标明,按照行号追溯源码,然后配合教程能够快速学习。
整体流程
IOC容器实例化代码
ApplicationContext applicationContext = new ClassPathXmlApplicationContext("bean.xml");进入代码中一步步追溯,发现重要方法:refresh(); 如下所示:
public void refresh() throws BeansException, IllegalStateException {

        synchronized (this.startupShutdownMonitor) {
            // Prepare this context for refreshing.
            prepareRefresh();
            //beanFactory实例化方法 单步调试入口
            // Tell the subclass to refresh the internal bean factory.
            ConfigurableListableBeanFactory beanFactory = obtainFreshBeanFactory();

            // Prepare the bean factory for use in this context.
            prepareBeanFactory(beanFactory);

            try {
                // Allows post-processing of the bean factory in context subclasses.
                postProcessBeanFactory(beanFactory);

                // Invoke factory processors registered as beans in the context.
                invokeBeanFactoryPostProcessors(beanFactory);

                // Register bean processors that intercept bean creation.
                registerBeanPostProcessors(beanFactory);

                // Initialize message source for this context.
                initMessageSource();

                // Initialize event multicaster for this context.
                initApplicationEventMulticaster();

                // Initialize other special beans in specific context subclasses.
                onRefresh();

                // Check for listener beans and register them.
                registerListeners();

                // Instantiate all remaining (non-lazy-init) singletons.
                finishBeanFactoryInitialization(beanFactory);

                // Last step: publish corresponding event.
                finishRefresh();
            }

            catch (BeansException ex) {
                // Destroy already created singletons to avoid dangling resources.
                destroyBeans();

                // Reset 'active' flag.
                cancelRefresh(ex);

                // Propagate exception to caller.
                throw ex;
            }
        }
    }
首先这个方法是同步的,以避免重复刷新。然后刷新的每个步骤,都放在单独的方法里,比较清晰,可以按顺序一个个看
首先是prepareRefresh()方法
protected void prepareRefresh() {
        this.startupDate = System.currentTimeMillis();

        synchronized (this.activeMonitor) {
            this.active = true;
        }

        if (logger.isInfoEnabled()) {
            logger.info("Refreshing " + this);
        }

        // Initialize any placeholder property sources in the context environment
        initPropertySources();

        // Validate that all properties marked as required are resolvable
        // see ConfigurablePropertyResolver#setRequiredProperties
        this.environment.validateRequiredProperties();
    }
这个方法里做的事情不多,记录了开始时间,输出日志,另外initPropertySources()方法和validateRequiredProperties()方法一般都没有做什么事。
然后是核心的obtainFreshBeanFactory()方法,这个方法是初始化BeanFactory,是整个refresh()方法的核心,其中完成了配置文件的加载、解析、注册,后面会专门详细说 。
这里要说明一下,ApplicationContext实现了BeanFactory接口,并实现了ResourceLoader、MessageSource等接口,可以认为是增强的BeanFactory。但是ApplicationContext并不自己重复实现BeanFactory定义的方法,而是委托给DefaultListableBeanFactory来实现。这种设计思路也是值得学习的。 后面的 prepareBeanFactory()、postProcessBeanFactory()、invokeBeanFactoryPostProcessors()、registerBeanPostProcessors()、initMessageSource()、initApplicationEventMulticaster()、onRefresh()、registerListeners()、finishBeanFactoryInitialization()、finishRefresh()等方法,是添加一些后处理器、广播、拦截器等,就不一个个细说了
其中的关键方法是finishBeanFactoryInitialization(),在这个方法中,会对刚才注册的Bean(不延迟加载的),进行实例化,所以也是一个核心方法。
bean.xml的处理
从整体上介绍完了流程,接下来就重点看obtainFreshBeanFactory()方法,上文说到,在这个方法里,完成了配置文件的加载、解析、注册
protected ConfigurableListableBeanFactory obtainFreshBeanFactory() {
        refreshBeanFactory();
        ConfigurableListableBeanFactory beanFactory = getBeanFactory();
        if (logger.isDebugEnabled()) {
            logger.debug("Bean factory for " + getDisplayName() + ": " + beanFactory);
        }
        return beanFactory;
    }
这个方法做了2件事,首先通过refreshBeanFactory()方法,创建了DefaultListableBeanFactory的实例,并进行初始化。
protected final void refreshBeanFactory() throws BeansException {
        if (hasBeanFactory()) {
            destroyBeans();
            closeBeanFactory();
        }
        try {
            DefaultListableBeanFactory beanFactory = createBeanFactory();
            beanFactory.setSerializationId(getId());
            customizeBeanFactory(beanFactory);
            loadBeanDefinitions(beanFactory);
            synchronized (this.beanFactoryMonitor) {
                this.beanFactory = beanFactory;
            }
        }
        catch (IOException ex) {
            throw new ApplicationContextException("I/O error parsing bean definition source for " + getDisplayName(), ex);
        }
    }
首先如果已经有BeanFactory实例,就先清空。然后通过createBeanFactory()方法,创建一个DefaultListableBeanFactory的实例
protected DefaultListableBeanFactory createBeanFactory() {
        return new DefaultListableBeanFactory(getInternalParentBeanFactory());
    }
接下来设置ID唯一标识
beanFactory.setSerializationId(getId());然后允许用户进行一些自定义的配置
protected void customizeBeanFactory(DefaultListableBeanFactory beanFactory) {
        if (this.allowBeanDefinitionOverriding != null) {
            beanFactory.setAllowBeanDefinitionOverriding(this.allowBeanDefinitionOverriding);
        }
        if (this.allowCircularReferences != null) {
            beanFactory.setAllowCircularReferences(this.allowCircularReferences);
        }
        beanFactory.setAutowireCandidateResolver(new QualifierAnnotationAutowireCandidateResolver());
    }
最后,就是核心的loadBeanDefinitions()方法
protected void loadBeanDefinitions(DefaultListableBeanFactory beanFactory) throws BeansException, IOException {
        // Create a new XmlBeanDefinitionReader for the given BeanFactory.
        XmlBeanDefinitionReader beanDefinitionReader = new XmlBeanDefinitionReader(beanFactory);

        // Configure the bean definition reader with this context's
        // resource loading environment.
        beanDefinitionReader.setEnvironment(this.getEnvironment());
        beanDefinitionReader.setResourceLoader(this);
        beanDefinitionReader.setEntityResolver(new ResourceEntityResolver(this));

        // Allow a subclass to provide custom initialization of the reader,
        // then proceed with actually loading the bean definitions.
        initBeanDefinitionReader(beanDefinitionReader);
        loadBeanDefinitions(beanDefinitionReader);
    }
这里首先会创建一个XmlBeanDefinitionReader的实例,然后进行初始化。这个XmlBeanDefinitionReader中其实传递的BeanDefinitionRegistry类型的实例,为什么可以传递一个beanFactory呢,因为DefaultListableBeanFactory实现了BeanDefinitionRegistry接口,这里是多态的使用。
protected void loadBeanDefinitions(DefaultListableBeanFactory beanFactory) throws BeansException, IOException {
        // Create a new XmlBeanDefinitionReader for the given BeanFactory.
        XmlBeanDefinitionReader beanDefinitionReader = new XmlBeanDefinitionReader(beanFactory);

        // Configure the bean definition reader with this context's
        // resource loading environment.
        beanDefinitionReader.setEnvironment(this.getEnvironment());
        beanDefinitionReader.setResourceLoader(this);
        beanDefinitionReader.setEntityResolver(new ResourceEntityResolver(this));

        // Allow a subclass to provide custom initialization of the reader,
        // then proceed with actually loading the bean definitions.
        initBeanDefinitionReader(beanDefinitionReader);
}
这里要说明一下,ApplicationContext并不自己负责配置文件的加载、解析、注册,而是将这些工作委托给XmlBeanDefinitionReader来做。
loadBeanDefinitions(beanDefinitionReader);这行代码,就是Bean定义读取实际发生的地方。这里的工作,主要是XmlBeanDefinitionReader来完成的,之后会详细介绍这个过程。


没有回复内容