实时通知是许多现代应用程序的重要功能,能够提升用户参与度并增强响应速度。得益于其强大的生态系统,Spring Boot 使得实现实时通知变得简单而高效。
本文,我们将向您展示如何利用 Spring Boot 和 WebSocket 构建一个实时通知系统,演示如何顺利实现这一基本功能。
什么是实时通知
实时通知,即客户端无需刷新或重复检查更新,服务端主动推送更新信息给用户。
常见的实际应用场景包括:
- 聊天应用
- 股票更新
- 仪表板的告警
Spring Boot + WebSocket实现
下面我们将使用Spring Boot + WebSocket来实现这一功能。
创建一个Spring Boot应用,然后添加WebSocket的Starter
<dependency>
    <groupId>org.springframework.boot</groupId>
    <artifactId>spring-boot-starter-websocket</artifactId>
</dependency>
配置WebSocket,通过将 @EnableWebSocketMessageBroker 注释添加到主应用程序类或专用配置类来启用 WebSocket 支持:
@Configuration
@EnableWebSocketMessageBroker
public class WebSocketConfig implements WebSocketMessageBrokerConfigurer {

    @Override
    public void configureMessageBroker(MessageBrokerRegistry config) {
        config.enableSimpleBroker("/topic");  // Prefix for broadcasting messages
        config.setApplicationDestinationPrefixes("/app");  // Prefix for client-to-server communication
    }

    @Override
    public void registerStompEndpoints(StompEndpointRegistry registry) {
        registry.addEndpoint("/ws")  // This is the WebSocket endpoint
                .setAllowedOrigins("http://localhost:63342")  // Allow frontend origin (localhost:63342)
                .withSockJS();  // Enable SockJS for fallback support
    }
}@EnableWebSocketMessageBroker:在应用程序中激活 WebSocket 消息处理。它允许使用 STOMP (Simple Text Oriented Messaging Protocol) 来处理通过 WebSocket 的消息。
enableSimpleBroker(“/topic”):启用一个简单的内存中消息代理,该消息代理将带有/topic前缀的消息路由到订阅者。- 示例:发送到
/topic/notifications的消息将广播到订阅此主题的所有客户端。 setApplicationDestinationPrefixes("/app"):定义从客户端发送到服务器的消息的前缀。- 示例:向
/app/sendMessage发送消息的客户端将触发映射到 的控制器方法@MessageMapping("/sendMessage")。 addEndpoint(“/ws”):将/ws定义为客户端用于建立连接的 WebSocket 终端节点。- 示例:前端可以连接到
ws://localhost:8080/ws以启动 WebSocket 会话。 setAllowedOrigins("http://localhost:63342"):限制允许连接的源(前端域)。这对于跨域资源共享 (CORS) 非常重要。- 在这里,源仅限于
http://localhost:63342,通常用于本地前端开发。 withSockJS():启用 Sockjs,这是一个在浏览器不支持 WebSocket 时提供回退选项的库。- 如果 WebSocket 失败,它会回退到 HTTP 流或长轮询等替代方案。
创建一个Controller来处理传入的 WebSocket 消息:
@Controller
public class NotificationController {

    @MessageMapping("/sendMessage") // Endpoint matching the JavaScript destination
    @SendTo("/topic/notifications") // Broadcast to subscribers of this topic
    public String sendMessage(String message) {
        System.out.println("Received message: " + message); // Debugging log
        return message; // Broadcast the message
    }

}
@MessageMapping(“/sendMessage”)
- 将发送到目标
/app/sendMessage(在WebSocketConfig中配置)的客户端消息映射到此方法。 - 由于
WebSocketConfigsetApplicationDestinationPrefixes("/app")中的@MessageMapping目标,前缀/app会自动添加到前面。 - 例:客户端向
/app/sendMessage发送消息,并触发此方法。
@SendTo(“/topic/notifications”)
- 指定应广播响应的主题。
- 任何订阅
/topic/notifications的客户端都将收到通过此方法发回的消息。 - 例:该方法的返回值将发送给
/topic/notifications的所有订阅者。
示例流程
- 客户端发送消息
- WebSocket 客户端向
/app/sendMessage发送消息。 sendMessage方法与消息负载一起调用。
- WebSocket 客户端向
- 广播消息
- 该方法记录收到的消息。
- 它返回消息,然后广播到订阅
/topic/notifications的所有客户端。
- 订阅者接收消息
- 任何订阅
/topic/notifications的客户端都会实时收到广播的消息。
- 任何订阅
构建前端
创建具有 WebSocket 连接的 HTML 文件:
<!DOCTYPE html>
<html lang="en">
<head>
    <meta charset="UTF-8">
    <title>Real-Time Notifications</title>
    <script src="https://cdn.jsdelivr.net/npm/sockjs-client/dist/sockjs.min.js"></script>
    <script src="https://cdn.jsdelivr.net/npm/stompjs/lib/stomp.min.js"></script>
</head>
<body>
<h1>Real-Time Notifications</h1>
<div id="notifications"></div>
<input type="text" id="message" placeholder="Enter your message">
<button onclick="sendMessage()">Send</button>

<script>
    let stompClient = null;

    function connect() {
    const socket = new SockJS('http://localhost:8080/ws');  // Correct the WebSocket URL
    stompClient = Stomp.over(socket);

    stompClient.connect({}, function (frame) {
        console.log('Connected: ' + frame);  // Log the successful connection
        stompClient.subscribe('/topic/notifications', function (message) {
            showNotification(message.body);  // Handle incoming messages
        });
    }, function (error) {
        console.error('WebSocket connection error: ' + error);  // Log WebSocket errors
    });
}


  function sendMessage() {
    const message = document.getElementById('message').value;
    if (stompClient && stompClient.connected) {
        stompClient.send('/app/sendMessage', {}, message);
        console.log('Message sent:', message);
    } else {
        console.error('WebSocket connection is not established.');
    }
}

    function showNotification(message) {
        const notifications = document.getElementById('notifications');
        const notification = document.createElement('p');
        notification.textContent = message;
        notifications.appendChild(notification);
    }

    connect();
</script>
</body>
</html>
让我们分解一下这个客户端代码,并了解我们在这里所做的每个步骤
function connect() {
    const socket = new SockJS('http://localhost:8080/ws');  // Correct the WebSocket URL
    stompClient = Stomp.over(socket);

    stompClient.connect({}, function (frame) {
        stompClient.subscribe('/topic/notifications', function (message) {
            showNotification(message.body);
        });
    }, function (error) {
        console.error('WebSocket connection error: ' + error);
    });
}
与后端服务器建立 WebSocket 连接并订阅 /topic/notifications 主题。
function sendMessage() {
    const message = document.getElementById('message').value;
    if (stompClient && stompClient.connected) {
        stompClient.send('/app/sendMessage', {}, message);
        console.log('Message sent:', message);
    } else {
        console.error('WebSocket connection is not established.');
    }
}
使用 document.getElementById 从 message 字段中获取输入值。下一步 将消息发送到 /app/sendMessage 目标,触发后端 NotificationController
function showNotification(message) {
    const notifications = document.getElementById('notifications');
    const notification = document.createElement('p');
    notification.textContent = message;
    notifications.appendChild(notification);
}
在网页上显示收到的消息。
让我们快速测试一下我们实现了什么实时通知功能:
- 启动 Spring Boot 应用程序
- 在浏览器中打开 HTML 文件
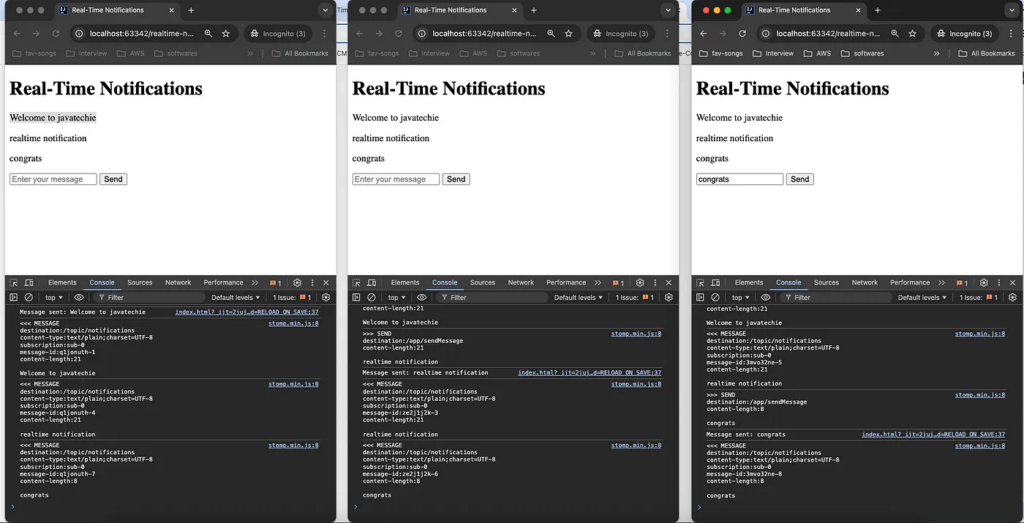
- 在输入框中输入消息,然后单击 Send。该消息将实时显示在通知区域中
也可以使用多个客户端来进行测试,当一个选项卡发送消息时,所有其他选项卡将立即收到通知,因为所有客户端都订阅了同一个 broker 。比如下面这样:
您可以在此处验证客户端控制台日志:
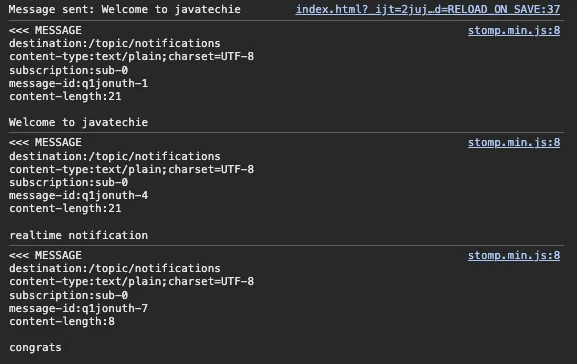
如果您仔细观察,每条消息都有一个唯一的消息 ID,并且此 ID 会因每个客户端而异。现在,让我们将此概念与实际实现(如 WhatsApp 群组)同步。
假设我创建了一个名为 javatechie-KT 的组,并添加了一些成员。每当我在此群组中发布消息时,订阅该消息的所有成员都会看到该消息。同样,如果组中的任何成员发送消息,我们所有人都会立即看到它,因为该消息被广播到为该组指定的单个代理,并且我们都订阅了该代理。