在本教程中,您将学习如何在 Spring Boot 应用程序中使用 JWT(JSON Web Token)认证,并使用最新版本的 Spring Security。我们将涵盖创建一个简单的 Spring Boot 应用程序、配置 Spring Security 以实现 JWT 认证,以及保护 RESTful API。
什么是 JWT 认证?
JWT(JSON Web Token)是一种紧凑且 URL 安全的表示方式,用于在双方之间传递声明。它通常用于现代 Web 应用程序中的认证和授权。JWT 是无状态的,可以在不查询数据库的情况下进行验证,使其在分布式系统中非常高效。
JWT 由三部分组成:
-
Header:指定用于签名令牌的算法和令牌类型。
-
Payload:包含声明,这些声明是关于实体(通常是用户)的陈述以及附加的元数据。
-
Signature:用于验证令牌的真实性并确保令牌未被篡改。
先决条件
在开始之前,请确保您具备以下条件:
-
已安装 Java 开发工具包(JDK 17 或更高版本)
-
已安装 Apache Maven(最新版本)
-
一个集成开发环境(IDE),如 IntelliJ IDEA 或 Eclipse(推荐使用 IntelliJ IDEA)
步骤 1:设置项目
创建 Spring Boot 项目
-
打开您的 IDE 并使用 Spring Initializr 创建一个新的 Spring Boot 项目。
-
添加以下依赖项:
-
Spring Web
-
Spring Security
-
Spring Data JPA
-
H2 数据库(为了简单起见,您可以选择任何数据库)
-
jjwt(用于生成和验证 JWT)——从下一步获取所有 jjwt 依赖项。
-
步骤 2:添加依赖项
在 pom.xml 文件中添加 Spring Security、Spring Data JPA、H2 数据库和 jjwt 的必要依赖项。
<dependencies>
<!-- Spring Boot Starter Web -->
<dependency>
<groupId>org.springframework.boot</groupId>
<artifactId>spring-boot-starter-web</artifactId>
</dependency>
<!-- Spring Boot Starter Security -->
<dependency>
<groupId>org.springframework.boot</groupId>
<artifactId>spring-boot-starter-security</artifactId>
</dependency>
<!-- Spring Boot Starter Data JPA -->
<dependency>
<groupId>org.springframework.boot</groupId>
<artifactId>spring-boot-starter-data-jpa</artifactId>
</dependency>
<!-- H2 Database -->
<dependency>
<groupId>com.h2database</groupId>
<artifactId>h2</artifactId>
<scope>runtime</scope>
</dependency>
<!-- JJWT (Java JWT) -->
<dependency>
<groupId>io.jsonwebtoken</groupId>
<artifactId>jjwt-api</artifactId>
<version>0.11.5</version>
</dependency>
<dependency>
<groupId>io.jsonwebtoken</groupId>
<artifactId>jjwt-impl</artifactId>
<version>0.11.5</version>
<scope>runtime</scope>
</dependency>
<dependency>
<groupId>io.jsonwebtoken</groupId>
<artifactId>jjwt-jackson</artifactId>
<version>0.11.5</version>
<scope>runtime</scope>
</dependency>
<!-- Spring Boot Starter Test -->
<dependency>
<groupId>org.springframework.boot</groupId>
<artifactId>spring-boot-starter-test</artifactId>
<scope>test</scope>
</dependency>
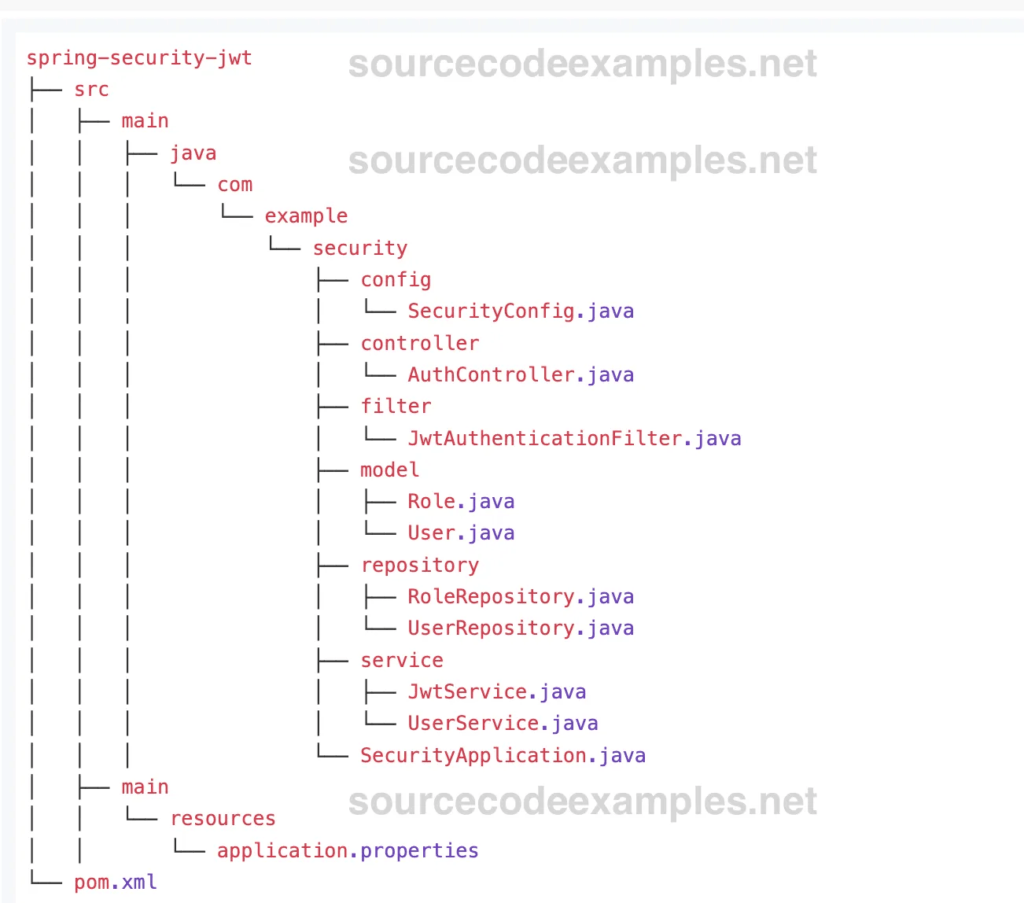
</dependencies>项目结构
您的项目结构应如下所示:
步骤 3:配置应用程序属性
为 H2 数据库和其他设置配置应用程序属性。
application.properties
# H2 Database configuration
spring.datasource.url=jdbc:h2:mem:testdb
spring.datasource.driverClassName=org.h2.Driver
spring.datasource.username=sa
spring.datasource.password=
spring.jpa.database-platform=org.hibernate.dialect.H2Dialect
spring.h2.console.enabled=true
spring.h2.console.path=/h2-console

# JPA settings
spring.jpa.hibernate.ddl-auto=update

# JWT settings
jwt.secret=yourSecretKey
jwt.expiration=3600000  # 1 hour in milliseconds
步骤 4:创建用户和角色实体
在 com.example.security.model 包中创建具有多对多关系的 User 和 Role 实体。
Role.java
@Entity
public class Role {

    @Id
    @GeneratedValue(strategy = GenerationType.IDENTITY)
    private Long id;

    private String name;

    @ManyToMany(mappedBy = "roles")
    private Set<User> users;

    // Getters and Setters

    public Long getId() {
        return id;
    }

    public void setId(Long id) {
        this.id = id;
    }

    public String getName() {
        return name;
    }

    public void setName(String name) {
        this.name = name;
    }

    public Set<User> getUsers() {
        return users;
    }

    public void setUsers(Set<User> users) {
        this.users = users;
    }
}
User.java
@Entity
public class User {

    @Id
    @GeneratedValue(strategy = GenerationType.IDENTITY)
    private Long id;

    private String username;
    private String password;

    @ManyToMany(fetch = FetchType.EAGER)
    @JoinTable(
        name = "user_role",
        joinColumns = @JoinColumn(name = "user_id"),
        inverseJoinColumns = @JoinColumn(name = "role_id")
    )
    private Set<Role> roles;

    // Getters and Setters

    public Long getId() {
        return id;
    }

    public void setId(Long id) {
        this.id = id;
    }

    public String getUsername() {
        return username;
    }

    public void setUsername(String username) {
        this.username = username;
    }

    public String getPassword() {
        return password;
    }

    public void setPassword(String password) {
        this.password = password;
    }

    public Set<Role> getRoles() {
        return roles;
    }

    public void setRoles(Set<Role> roles) {
        this.roles = roles;
    }
}
步骤 5:创建存储库
在 com.example.security.repository 包中创建 UserRepository 和 RoleRepository 接口。
UserRepository.java
package com.example.security.repository;

import com.example.security.model.User;
import org.springframework.data.jpa.repository.JpaRepository;

public interface UserRepository extends JpaRepository<User, Long> {
    User findByUsername(String username);
}
RoleRepository.java
package com.example.security.repository;

import com.example.security.model.Role;
import org.springframework.data.jpa.repository.JpaRepository;

public interface RoleRepository extends JpaRepository<Role, Long> {
    Role findByName(String name);
}
步骤 6:创建 JWT 服务
在 com.example.security.service 包中创建一个 JwtService 类,用于生成和验证 JWT 令牌。
JwtService.java
package com.example.security.service;

import io.jsonwebtoken.Claims;
import io.jsonwebtoken.Jwts;
import io.jsonwebtoken.SignatureAlgorithm;
import org.springframework.beans.factory.annotation.Value;
import org.springframework.stereotype.Service;

import java.util.Date;

@Service
public class JwtService {

    @Value("${jwt.secret}")
    private String secret;

    @Value("${jwt.expiration}")
    private long expiration;

    public String generateToken(String username) {
        return Jwts.builder()
                .setSubject(username)
                .setIssuedAt(new Date())
                .setExpiration(new Date(System.currentTimeMillis() + expiration))
                .signWith(SignatureAlgorithm.HS512, secret)
                .compact();
    }

    public Claims getClaimsFromToken(String token) {
        return Jwts.parser()
                .setSigningKey(secret)
                .parseClaimsJws(token)
                .getBody();
    }

    public boolean isTokenValid(String token) {
        try {
            Claims claims = getClaimsFromToken(token);
            return !claims.getExpiration().before(new Date());
        } catch (Exception e) {
            return false;
        }
    }

    public String getUsernameFromToken(String token) {
        return getClaimsFromToken(token).getSubject();
    }
}
步骤 7:创建用户服务
创建一个 UserService 类和一个 UserDetailsServiceImpl 类来管理用户并加载用户特定的数据。
UserService.java
package com.example.security.service;

import com.example.security.model.Role;
import com.example.security.model.User;
import com.example.security.repository.RoleRepository;
import com.example.security.repository.UserRepository;
import org.springframework.beans.factory.annotation.Autowired;
import org.springframework.security.crypto.password.PasswordEncoder;
import org.springframework.stereotype.Service;

import javax.annotation.PostConstruct;
import java.util.HashSet;

@Service
public class UserService {

    @Autowired
    private UserRepository userRepository;

    @Autowired
    private RoleRepository roleRepository;

    @Autowired
    private PasswordEncoder passwordEncoder;

    @PostConstruct
    public void init() {
        // Create roles
        Role adminRole = new Role();
        adminRole.setName("ADMIN");
        roleRepository.save(adminRole);

        Role userRole = new Role();
        userRole.setName("USER");
        roleRepository.save(userRole);

        // Create users
        User admin = new User();
        admin.setUsername("admin");
        admin.setPassword(passwordEncoder.encode("admin"));
        admin.setRoles(new HashSet<>(Set.of(adminRole)));
        userRepository.save(admin);

        User user = new User();
        user.setUsername("user");
        user.setPassword(passwordEncoder.encode("password"));
        user.setRoles(new HashSet<>(Set.of(userRole)));
        userRepository.save(user);
    }
}
UserDetailsServiceImpl.java
package com.example.security.service;

import com.example.security.model.User;
import com.example.security.repository.UserRepository;
import org.springframework.beans.factory.annotation.Autowired;
import org.springframework.security.core.userdetails.UserDetails;
import org.springframework.security.core.userdetails.UserDetailsService;
import org.springframework.security.core.userdetails.UsernameNotFoundException;
import org.springframework.security.core.userdetails.User;
import org.springframework.stereotype.Service;

@Service
public class UserDetailsServiceImpl implements UserDetailsService {

    @Autowired
    private UserRepository userRepository;

    @Override
    public UserDetails loadUserByUsername(String username) throws UsernameNotFoundException {
        com.example.security.model.User user = userRepository.findByUsername(username);
        if (user == null) {
            throw new UsernameNotFoundException("User not found");
        }
        return User.builder()
                .username(user.getUsername())
                .password(user.getPassword())
                .roles(user.getRoles().stream().map(role -> role.getName()).toArray(String[]::new))
                .build();
    }
}
步骤 8:创建 JWT 认证过滤器
在 com.example.security.filter 包中创建一个 JwtAuthenticationFilter 类,用于基于 JWT 令牌过滤和认证请求。
JwtAuthenticationFilter.java
package com.example.security.filter;

import com.example.security.service.JwtService;
import com.example.security.service.UserDetailsServiceImpl;
import org.springframework.beans.factory.annotation.Autowired;
import org.springframework.security.authentication.UsernamePasswordAuthenticationToken;
import org.springframework.security.core.context.SecurityContextHolder;
import org.springframework.security.web.authentication.WebAuthenticationDetailsSource;
import org.springframework.stereotype.Component;
import org.springframework.web.filter.OncePerRequestFilter;

import javax.servlet.FilterChain;
import javax.servlet.ServletException;
import javax.servlet.http.HttpServletRequest;
import javax.servlet.http.HttpServletResponse;
import java.io.IOException;

@Component
public class JwtAuthenticationFilter extends OncePerRequestFilter {

    @Autowired
    private JwtService jwtService;

    @Autowired
    private UserDetailsServiceImpl userDetailsService;

    @Override
    protected void doFilterInternal(HttpServletRequest request, HttpServletResponse response, FilterChain chain)
            throws ServletException, IOException {
        String authorizationHeader = request.getHeader("Authorization");

        String username = null;
        String jwt = null;

        if (authorizationHeader != null && authorizationHeader.startsWith("Bearer ")) {
            jwt = authorizationHeader.substring(7);
            username = jwtService.getUsernameFromToken(jwt);
        }

        if (username != null && SecurityContextHolder.getContext().getAuthentication() == null) {
            UserDetails userDetails = userDetailsService.loadUserByUsername(username);

            if (jwtService.isTokenValid(jwt)) {
                UsernamePasswordAuthenticationToken authentication = new UsernamePasswordAuthenticationToken(
                        userDetails, null, userDetails.getAuthorities());
                authentication.setDetails(new WebAuthenticationDetailsSource().buildDetails(request));
                SecurityContextHolder.getContext().setAuthentication(authentication);
            }
        }

        chain.doFilter(request, response);
    }
}
步骤 9:配置 Spring Security
在 com.example.security.config 包中创建一个 SecurityConfig 类,用于配置 Spring Security 以实现 JWT 认证。
SecurityConfig.java
package com.example.security.config;

import com.example.security.filter.JwtAuthenticationFilter;
import com.example.security.service.UserDetailsServiceImpl;
import org.springframework.beans.factory.annotation.Autowired;
import org.springframework.context.annotation.Bean;
import org.springframework.context.annotation.Configuration;
import org.springframework.security.authentication.AuthenticationManager;
import org.springframework.security.config.annotation.authentication.builders.AuthenticationManagerBuilder;
import org.springframework.security.config.annotation.web.builders.HttpSecurity;
import org.springframework.security.config.annotation.web.configuration.EnableWebSecurity;
import org.springframework.security.config.http.SessionCreationPolicy;
import org.springframework.security.crypto.bcrypt.BCryptPasswordEncoder;
import org.springframework.security.crypto.password.PasswordEncoder;
import org.springframework.security.web.SecurityFilterChain;
import org.springframework.security.web.authentication.UsernamePasswordAuthenticationFilter;

@Configuration
@EnableWebSecurity
public class SecurityConfig {

    @Autowired
    private JwtAuthenticationFilter jwtAuthenticationFilter;

    @Autowired
    private UserDetailsServiceImpl userDetailsService;

    @Bean
    public SecurityFilterChain securityFilterChain(HttpSecurity http) throws Exception {
        http
            .csrf().disable()
            .authorizeHttpRequests(authorizeRequests ->
                authorizeRequests
                    .antMatchers("/auth/**").permitAll()
                    .anyRequest().authenticated()
            )
            .sessionManagement(sessionManagement ->
                sessionManagement.sessionCreationPolicy(SessionCreationPolicy.STATELESS)
            );

        http.addFilterBefore(jwtAuthenticationFilter, UsernamePasswordAuthenticationFilter.class);

        return http.build();
    }

    @Bean
    public PasswordEncoder passwordEncoder() {
        return new BCryptPasswordEncoder();
    }

    @Bean
    public AuthenticationManager authenticationManager(HttpSecurity http, PasswordEncoder passwordEncoder, UserDetailsServiceImpl userDetailsService) throws Exception {
        return http.getSharedObject(AuthenticationManagerBuilder.class)
                .userDetailsService(userDetailsService)
                .passwordEncoder(passwordEncoder)
                .and()
                .build();
    }
}
步骤 10:创建认证控制器
在 com.example.security.controller 包中创建一个 AuthController 类,用于处理认证请求。
AuthController.java
package com.example.security.controller;

import com.example.security.service.JwtService;
import org.springframework.beans.factory.annotation.Autowired;
import org.springframework.security.authentication.AuthenticationManager;
import org.springframework.security.authentication.UsernamePasswordAuthenticationToken;
import org.springframework.security.core.Authentication;
import org.springframework.security.core.context.SecurityContextHolder;
import org.springframework.security.core.userdetails.UserDetails;
import org.springframework.web.bind.annotation.*;

@RestController
@RequestMapping("/auth")
public class AuthController {

    @Autowired
    private AuthenticationManager authenticationManager;

    @Autowired
    private JwtService jwtService;

    @PostMapping("/login")
    public String login(@RequestParam String username, @RequestParam String password) {
        Authentication authentication = authenticationManager.authenticate(
                new UsernamePasswordAuthenticationToken(username, password));
        SecurityContextHolder.getContext().setAuthentication(authentication);

        UserDetails userDetails = (UserDetails) authentication.getPrincipal();
        return jwtService.generateToken(userDetails.getUsername());
    }
}
步骤 11:创建主应用程序类
创建主应用程序类以运行您的 Spring Boot 应用程序。
SecurityApplication.java
package com.example.security;

import org.springframework.boot.SpringApplication;
import org.springframework.boot.autoconfigure.SpringBootApplication;

@SpringBootApplication
public class SecurityApplication {

    public static void main(String[] args) {
        SpringApplication.run(SecurityApplication.class, args);
    }
}
步骤 12:运行应用程序
要运行应用程序,请执行 SecurityApplication 类。这将启动配置了 Spring Security 以实现 JWT 认证的 Spring Boot 应用程序。
访问应用程序
-
打开浏览器或 Postman 等工具,并导航到
http://localhost:8080/auth/login。 -
发送带有
username和password参数的 POST 请求以进行认证。响应将包含 JWT 令牌。 -
使用 JWT 令牌访问受保护的端点,将其包含在
Authorization头中,并带有Bearer前缀。
使用 curl 访问 API
# Get JWT token
TOKEN=$(curl -X POST -d "username=user&password=password" http://localhost:8080/auth/login)

# Access secured endpoint
curl -H "Authorization: Bearer $TOKEN" http://localhost:8080/api/hello
结论
在本教程中,我们逐步介绍了如何设置一个基本的 Spring Boot 应用程序,并将其与 Spring Security 集成以实现 JWT 认证。我们配置了 Spring Security 以使用 JWT 令牌保护我们的应用程序,创建了一个简单的 RESTful API 端点,并提供了生成和验证 JWT 的机制。
通过本教程,您现在应该对如何将 Spring Security 与 Spring Boot 集成并使用 JWT 认证保护 REST API 有了很好的理解。